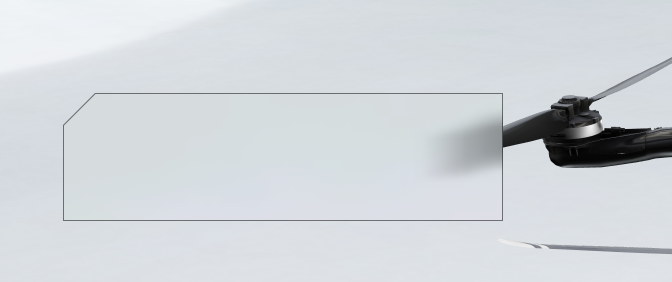
用于不规则按钮区域增加高斯模糊处理,实现原理就是截取控件在整个背景图像位置的图像,做高斯模糊处理之后,使用自定义的Path区域去裁剪绘制不规则区域的高斯模糊效果。
一、控件Kotlin实现代码
import android.content.Context
import android.graphics.*
import android.renderscript.Allocation
import android.renderscript.Element
import android.renderscript.RenderScript
import android.renderscript.ScriptIntrinsicBlur
import android.util.AttributeSet
import androidx.appcompat.widget.AppCompatImageView
import java.util.concurrent.Executors
import java.util.concurrent.atomic.AtomicBoolean

/**
 * 航前检查区域高斯模糊处理View
 */
class IrregularBlurView @JvmOverloads constructor(
    context: Context,
    attrs: AttributeSet? = null,
    defStyleAttr: Int = 0
) : AppCompatImageView(context, attrs, defStyleAttr) {

    private val blurPath = Path()
    private var blurredBackground: Bitmap? = null
    private var triangleCutSize: Float = 32f
    private var blurRadius: Float = 15f
    private var lastSourceBitmap: Bitmap? = null

    // 性能优化相关
    private val blurExecutor = Executors.newSingleThreadExecutor()
    private val isBlurInProgress = AtomicBoolean(false)
    private var rs: RenderScript? = null
    private var blurScript: ScriptIntrinsicBlur? = null
    private var allocationIn: Allocation? = null
    private var allocationOut: Allocation? = null

    // 防抖参数
    private var lastUpdateTime: Long = 0
    private val UPDATE_THRESHOLD = 33L // 30fps,约33ms

    // 缩放参数
    private val SCALE_FACTOR = 0.25f // 缩小4倍进行模糊,大幅提升性能

    init {
        setBackgroundColor(Color.TRANSPARENT)

        val typedArray = context.obtainStyledAttributes(attrs, R.styleable.IrregularBlurView)
        triangleCutSize = typedArray.getDimension(
            R.styleable.IrregularBlurView_triangleCutSize, 32f
        )
        blurRadius = typedArray.getFloat(
            R.styleable.IrregularBlurView_blurRadius, 15f
        )
        typedArray.recycle()

        // 预初始化RenderScript资源
        initializeRenderScript()
    }

    private fun initializeRenderScript() {
        try {
            rs = RenderScript.create(context)
            blurScript = ScriptIntrinsicBlur.create(rs, Element.U8_4(rs))
        } catch (e: Exception) {

        }
    }

    override fun onDetachedFromWindow() {
        super.onDetachedFromWindow()
        cleanup()
    }

    private fun cleanup() {
        // 取消正在进行的模糊任务
        isBlurInProgress.set(false)

        // 释放RenderScript资源
        blurScript?.destroy()
        allocationIn?.destroy()
        allocationOut?.destroy()
        rs?.destroy()

        blurredBackground?.recycle()
        blurredBackground = null
    }

    fun setSourceBitmap(bitmap: Bitmap) {
        if (bitmap.isRecycled) {
            return
        }

        // 防抖检查
        val currentTime = System.currentTimeMillis()
        if (currentTime - lastUpdateTime < UPDATE_THRESHOLD) {
            return
        }
        lastUpdateTime = currentTime

        lastSourceBitmap = bitmap

        if (width == 0 || height == 0) {
            return
        }

        // 使用后台线程进行模糊处理
        processBlurAsync(bitmap)
    }

    private fun getLocationOnScreen(): IntArray {
        val location = IntArray(2)
        getLocationOnScreen(location)
        return location
    }

    private fun processBlurAsync(bitmap: Bitmap) {
        if (isBlurInProgress.getAndSet(true)) {
            return // 已有任务在进行中
        }

        blurExecutor.execute {
            try {
                val result = performBlurOperation(bitmap)
                post {
                    isBlurInProgress.set(false)
                    result?.let {
                        updateBlurredBackground(it)
                    }
                }
            } catch (e: Exception) {
                isBlurInProgress.set(false)
            }
        }
    }

    private fun performBlurOperation(bitmap: Bitmap): Bitmap? {
        return try {
            val location = getLocationOnScreen()
            val x = location[0]
            val y = location[1]

            // 安全的裁剪区域计算
            val safeLeft = x.coerceIn(0, bitmap.width - 1)
            val safeTop = y.coerceIn(0, bitmap.height - 1)
            val safeWidth = width.coerceAtMost(bitmap.width - safeLeft)
            val safeHeight = height.coerceAtMost(bitmap.height - safeTop)

            if (safeWidth <= 0 || safeHeight <= 0) {
                return null
            }

            // 裁剪源区域
            val croppedBitmap = Bitmap.createBitmap(
                bitmap, safeLeft, safeTop, safeWidth, safeHeight
            )

            // 优化后的模糊处理
            val blurred = optimizedSafeBlur(croppedBitmap)
            croppedBitmap.recycle()
            blurred
        } catch (e: Exception) {
            null
        }
    }

    private fun updateBlurredBackground(bitmap: Bitmap) {
        blurredBackground?.recycle()
        blurredBackground = bitmap
        invalidate()
    }

    /**
     * 优化后的安全模糊方法
     */
    private fun optimizedSafeBlur(image: Bitmap): Bitmap {
        // 1. 大幅缩小图片尺寸进行模糊
        val scaledWidth = (image.width * SCALE_FACTOR).toInt().coerceAtLeast(1)
        val scaledHeight = (image.height * SCALE_FACTOR).toInt().coerceAtLeast(1)

        val inputBitmap = Bitmap.createScaledBitmap(image, scaledWidth, scaledHeight, true)

        // 2. 使用预分配的RenderScript资源
        val result = try {
            renderScriptBlur(inputBitmap)
        } catch (e: Exception) {
            fastJavaBlur(inputBitmap)
        }

        // 3. 模糊后放大到原始尺寸
        val finalResult = Bitmap.createScaledBitmap(result, image.width, image.height, true)

        // 回收临时bitmap
        inputBitmap.recycle()
        if (result != finalResult) {
            result.recycle()
        }

        return finalResult
    }

    /**
     * 使用预分配资源的RenderScript模糊
     */
    private fun renderScriptBlur(input: Bitmap): Bitmap {
        val rs = this.rs ?: throw IllegalStateException("RenderScript not initialized")
        val blurScript = this.blurScript ?: throw IllegalStateException("Blur script not initialized")

        // 重用或重新创建Allocation
        if (allocationIn == null || allocationIn!!.type.element != Element.U8_4(rs)) {
            allocationIn?.destroy()
            allocationIn = Allocation.createFromBitmap(rs, input)
        } else {
            allocationIn!!.copyFrom(input)
        }

        if (allocationOut == null || allocationOut!!.type.element != Element.U8_4(rs)) {
            allocationOut?.destroy()
            allocationOut = Allocation.createTyped(rs, allocationIn!!.type)
        }

        val outputBitmap = Bitmap.createBitmap(input.width, input.height, Bitmap.Config.ARGB_8888)

        blurScript.setRadius(blurRadius.coerceIn(0.1f, 25f))
        blurScript.setInput(allocationIn)
        blurScript.forEach(allocationOut)
        allocationOut!!.copyTo(outputBitmap)

        return outputBitmap
    }

    /**
     * 快速Java模糊实现(备选方案)
     */
    private fun fastJavaBlur(src: Bitmap): Bitmap {
        val radius = 5 // 固定小半径,保证性能

        val w = src.width
        val h = src.height
        val output = Bitmap.createBitmap(w, h, Bitmap.Config.ARGB_8888)

        val srcPixels = IntArray(w * h)
        val dstPixels = IntArray(w * h)
        src.getPixels(srcPixels, 0, w, 0, 0, w, h)

        // 水平模糊
        for (y in 0 until h) {
            for (x in 0 until w) {
                var a = 0
                var r = 0
                var g = 0
                var b = 0
                var count = 0

                for (dx in -radius..radius) {
                    val nx = (x + dx).coerceIn(0, w - 1)
                    val pixel = srcPixels[y * w + nx]
                    a += Color.alpha(pixel)
                    r += Color.red(pixel)
                    g += Color.green(pixel)
                    b += Color.blue(pixel)
                    count++
                }

                dstPixels[y * w + x] = Color.argb(
                    a / count, r / count, g / count, b / count
                )
            }
        }

        // 垂直模糊
        for (x in 0 until w) {
            for (y in 0 until h) {
                var a = 0
                var r = 0
                var g = 0
                var b = 0
                var count = 0

                for (dy in -radius..radius) {
                    val ny = (y + dy).coerceIn(0, h - 1)
                    val pixel = dstPixels[ny * w + x]
                    a += Color.alpha(pixel)
                    r += Color.red(pixel)
                    g += Color.green(pixel)
                    b += Color.blue(pixel)
                    count++
                }

                srcPixels[y * w + x] = Color.argb(
                    a / count, r / count, g / count, b / count
                )
            }
        }

        output.setPixels(srcPixels, 0, w, 0, 0, w, h)
        return output
    }

    override fun onSizeChanged(w: Int, h: Int, oldw: Int, oldh: Int) {
        super.onSizeChanged(w, h, oldw, oldh)
        updateBlurPath()
        lastSourceBitmap?.let { setSourceBitmap(it) }
    }

    private fun updateBlurPath() {
        blurPath.reset()
        blurPath.apply {
            moveTo(triangleCutSize, 0f)
            lineTo(width.toFloat(), 0f)
            lineTo(width.toFloat(), height.toFloat())
            lineTo(0f, height.toFloat())
            lineTo(0f, triangleCutSize)
            close()
        }
    }

    override fun onDraw(canvas: Canvas) {
        blurredBackground?.let { bitmap ->
            if (!bitmap.isRecycled) {
                canvas.save()
                canvas.clipPath(blurPath)
                canvas.drawBitmap(bitmap, 0f, 0f, null)
                canvas.restore()
            }
        }
        super.onDraw(canvas)
    }

    companion object {
        private const val TAG = "IrregularBlurView"
    }
}
其中 blurPath 为不规则区域的Path参数,上面控件中实现的是左上角缺失一个三角形的不规则区域图形,可以根据自己的需求自定义不规则图形区域。setSourceBitmap(bitmap: Bitmap) 设置值为整个背景的BItmap,控件内部根据当前控件所在区域截取Path区域的内容做高斯模糊处理。
样式配置如下:
    <declare-styleable name="IrregularBlurView">
        <attr name="triangleCutSize" format="reference" />
        <attr name="blurRadius" format="reference" />
    </declare-styleable>
扩展阅读:
- Android 航线剖面图自定义控件绘制实现
- Android 自定义棱形样式进度条控件
- Android 弧形 RecyclerView 实现(Kotlin)
- 美图手机音乐Widget动画实现
- Android 心率动画自定义控件实现
- Android 卡片旋转切换动效实现详解
- Android 残影数字动画实现详解
- Android 自定义菱形横向滑动指示器控件
- Android 航线缩略图简易绘制实现
- Android PDF文件浏览及目录显示交互实现

微信公众号
转载请注明出处:陈文管的博客 – Android不规则图形高斯模糊控件实现